$ssh <META login>@zuphux.cerit-sc.cz
Password: <Enter META password>
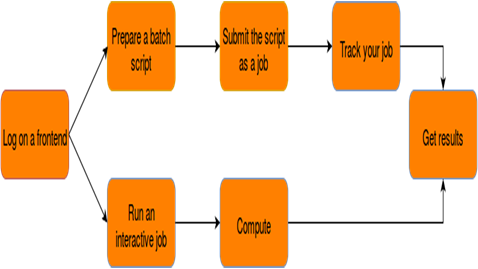
How to start a batch job in grid
Grid computing can be generally described with the following schema:
1. Log on the CERIT-SC frontend:
The details about available frontends as well as available log-in methods can be found in the section Infrastructure access.
Usage rules and registration page
2. Create job's startup script:
The following lines present the creation of a startup script running the Gaussian version 03. Refer to the Examples section for further details on creating the startup scripts in the CERIT-SC environment.
Create skript.sh text file (in your favourite text editor) with the following lines:
#!/bin/bash
# sets home directory
DATADIR="/storage/brno2/home/$LOGNAME/"
# loads the Gaussian's module, version 03
module add g03
# enters user's scratch directory
cd $SCRATCHDIR
# prepares job's input data
wget http://www.cerit-sc.cz/en/docs/quickstart
/gaussian_test.com
# starts the Gaussian application
g03 <gaussian_test.com >results.out
# moves the produced (output) data to user's home directory
cp results.out $DATADIR
# cleans the working directory
rm -rf $SCRATCHDIR
3. Specify job's parameters/properties and submit the job:
The following lines present the above job's submission, requesting 1 node having 2 processors, 10GB scratch and specifying its maximum run time in the length of 1 hour:
qsub -l select=1:ncpus=2:mem=1gb:sratch_local=1gb
-l walltime=1:00:00 skript.sh
Job will get a jobID, for example 12345.wagap.cerit-sc.cz
Further details about jobs' parameters specification, and especially about the usage of the optional walltime parameter (specifying the maximum job's run time), can be found in the PDF leaflet PBS Pro quick start Guide:
The default walltime value restricts jobs' run time to 24 hours.
4. Check/Monitor the job's state:
You can use jobID and qstat command to track the job. Type line below into your terminal:
$ qstat -u <login> # lists all user running or
waiting jobs
$ qstat -xu <login> # list all user jobs (also
finished)
$ qstat <jobID> # outputs basic information about
the job
$ qstat -f <jobID> # outputs more detailed
information about running or waiting job
$ qstat -xf <jobID> # outputs more detailed
information about running, waiting or finished job

$ qdel<jobID> # kills the job (if necessary)
See the man qstat page for a description of all options.
Status of the job (most common):
Q ... queued E ... exiting
R ... running F ... finished
5. Examine job's standard output and standard error output (as soon as the job finishes):
$ less ~/results.out       # job's output data
$ less ~/myjob.sh.o12345   # job's standard output
                           # empty for now (forwarded to results.out)
$ less ~/myjob.sh.e12345   # job's standard error output
More detail guide https://wiki.metacentrum.cz/wiki/How_to_start_computing_-_tutorial

How to run a VM in MetaCloud
1. Login in web interface
Register to the Metacentrum cloud and log in the web interface https://cloud.metacentrum.cz/.
2. Run virtual machine in cloud view
New virtual machines are created with the green "plus" button. A new page appears. Choose short name of new virtual machine. A list with available templates appears, it also involves operating system icons. You may filter this list by inserting a string into search field.
- Click on the selected template.
- You may change number of CPU or amount of RAM memory in Capacity.
- You may also remove some from IP addresses in Network. We recommend not to add an additional IP addresses, because an impossible combination can be created by allocating VM to physical device and IP address.
- Confirm new VM by pressing a button Create at the top of the page.
Your new virtual machine will be in DEPLOYING state for a moment and after a while, it switches to RUNNING. The delay is caused by time necessary to copy the selected image to the physical host and boot the operating system.
Assigned IP address is highlighted in picture:

3. Login to virtual machine
Prepared images by our side downloads updates and reboots, so wait for a while until virtual machine gets to the state RUNNING.
SSH
To login to running virtual machine with OS Linux as a user root by ssh (your ssh key is in your application form and is imported by kontextualization,
ssh root@ip_adresa
where ip_address is your virtual machine public IP address.
You may use to remote access to the virtual machine program Putty, if you use Windows operating system in the image.
By VNC
If VM template supported VNC usage, you may use graphical interface of operating system in virtual machine. Linux shows the

CLI only, whereas Windows is more usable for users.
After running VM, button VNC will be active.
In view cloud upper left:

after a clicking on VNC button, VNC client GUI appears in a browser. You can not use other VNC client and connect directly, because VNC server do not listen on public IP address. But programs as Remote desktop or TeamViewer may be used.
Notice: To connect the Remote desktop application you should first allow this connection. Try the Control panel: Control Panel -> System -> Remote settings.
4. Virtual machine environment
You can operate virtual machines with OS Linux by commands typed in CLI. You may get more familiar with Linux commands by getting through tutorials.
Your Virtual Machine is fully under your control, our administrators have no access to it. You are fully responsible for it.
WARNING: Keep software up to date in running virtual machine!
If you no longer use the virtual machine, turn it off (Undeploy) or delete it (Shutdown).
Every time, you do not need a virtual machine, shut it down or undeploy. The virtual machine that is only stopped, blocks the physical machines where they are allocated.
More details
https://wiki.metacentrum.cz/wiki/MetaCloud_testbed_-_quick_guide